Create a folder in Windows 7 and rename it to
GodMode.{ED7BA470-8E54-465E-825C-99712043E01C}
Then check out its contents.
Create a folder in Windows 7 and rename it to
GodMode.{ED7BA470-8E54-465E-825C-99712043E01C}
Then check out its contents.
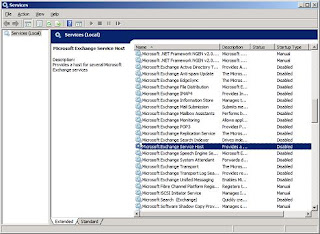
Recently I was involved in an issue where Microsoft Exchange Mail submission used to stop silently in day or two on the passive node of the CCR cluster. This used to happen only on one of the Node of the CCR Cluster. There will be no event generated in the logs. This service is responsible for submitting mails from the Mailbox Server to the HUB Server. So in case if the resource fails over to this node then the users will face mail issues. In this case, if the user tries to send a mail, it will stay on their outbox until we manually go and start the service or failback the resources to the other node. While starting the service it used to start without any issue.
I was sure that there is nothing wrong with the server hardware or Operating system or Exchange configuration on this node as there was not a single error getting generated for this issue. I checked the service setting under Service Manager and cross checked with the other node. It was same. I did some goggling but unfortunately couldn't get any answer for this issue. It made me wonder "why am I the only one to face this issue".
After sleeping on this issue for 2 day, I thought of digging in the registry of this node. I went to registry value of HKLM\system\CurrentControlSet\Services\MSExchangeMailSubmission. I starting checking the settings of each registry of this node with the other node. There I found a difference in the values of "FailureActions". On the passive the values were as per the screen Shot in fig 1. While on the passive node it was as per fig 2.


I immediately took the backup of the registry and made the changes on the passive node same as that of the active node. I did some testing by stopping and starting services as well as by doing failover of resources from the active node to the passive node and checking the mailflow. After the testing I failed the resources back to the other node. The services which used to stop earlier in a day or two is now running for over two weeks now.
Note: Please make sure to have a restorable backup of Exchange and registry before performing any changes.
Exchange 2007 SP2 Overview
Microsoft Exchange Server 2007 SP2 helps meet the challenges and business needs of any Organization with the stake in messaging system. Exchange 2007 SP2 is a mission-critical communications tool that enables employees to be more productive and access their information anytime from anywhere. For the Administrators, Exchange Server 2007 SP2 provides advanced protection options against email security threats, such as spam and antivirus as well as tools to help manage internal compliance and high availability needs.
Whats New in Exchange 2007 SP2
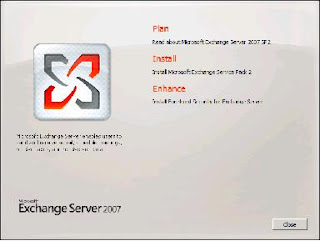
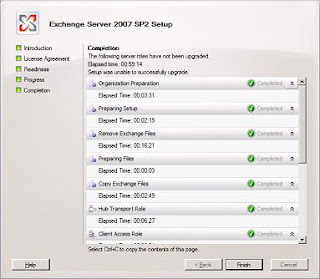
Step by step process for Upgrading Exchange 2007 SP1 to SP2


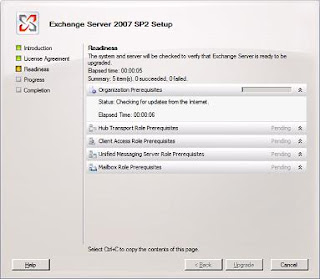

Prerequisites for Deploying Exchange 2007
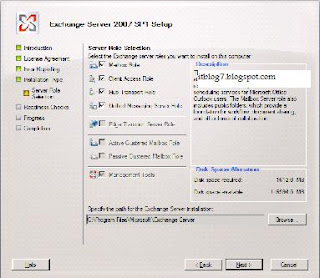
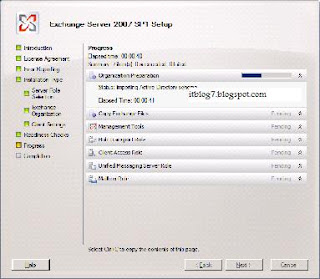
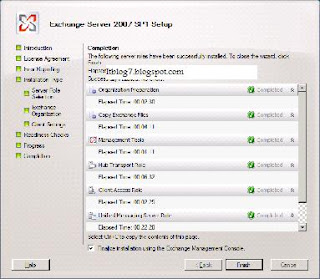
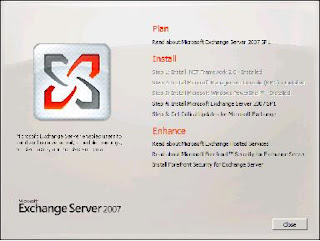 You will be presented with the above screen. Step 1, 2 and 3 will be highlighted if the required prerequisites are missing. For installing Exchange 2007 SP1 click on Step4. You will be presented with the below screen.

Object | Rights to create | Rights to modify | Rights to delete | Rights to distribute |
Boot Images | Create\Boot image package, Read\Boot image package | Modify\Boot image package, Read\Boot image package | Delete\Boot image package, Read\Boot image package | Read\Boot image package, Modify\Boot image package, Distribute\Boot image package, Read\Site |
Computer Association | Create\Computer association, Read\Computer association, Read\Collection | Modify\Computer association, Read\Computer association | Delete\Computer association, Read\Computer association | Not applicable |
Operating System Images | Create\OS image, Read\OS image | Modify\OS image, Read\OS image | Delete\OS image, Read\OS image | Modify\OS image, Read\OS image, Distribute\OS image, Read\Site |
Operating System Install Pacakges | Create\OS install package, Read\OS install package | Modify\OS install package, Read\OS install package | Delete\OS install package, Read\OS install package | Modify\OS install package, Read\OS install package, Distribute\OS install package, Read\Site |
Task Sequences | Create\Task sequence package, Read\Task sequence package, Modify\Task sequence package | Modify\Task sequence package, Read\Task sequence package | Delete\Task sequence package, Read\Task sequence package | Modify\Task sequence package, Read\Task sequence package, Distribute\Task sequence package, Read\Site |
Advertisement (for task sequence) | Read\Task sequence package, Read\Collection, Advertise\Collection, Read\Package, Create\Advertisement | Modify\Advertisement, Read\Advertisement | Delete\Advertisement, Read\Advertisement | Not applicable |
Task sequence bootable media | Read\Task sequence package, Create Task sequence media\Task sequence package, Read\Site, Manage OSD and ISV Proxy Certificates\Site, Read\Boot image | Modify\Task sequence package, Read\Task sequence package | Delete\Task sequence package, Read\Task sequence package | Not applicable |
Drivers | Create\Device driver, Read\Device driver | Modify\Device driver, Read\Device driver | Delete\Device driver, Read\Device driver | Not applicable |
Driver package | Create\Driver package, Read\Device driver | Modify\Driver package, Read\Driver package, Distribute\Driver packages | Delete\Driver package, Read\Driver package | Not applicable |
VMC to Hyper-V Import Tool
http://technet.microsoft.com/en-us/magazine/2009.03.utilityspotlight.aspx?pr=blog
Exchange 2010 has some carried over features from Exchange 2007 as well as some improved and new features broadly falling under the below categories
Listed below are the features that have carried over from Exchange 2007 as well as improved and new features falling under each of these categories
Protection and Collaboration
The goal of protection and collaboration is to achieve increased IT governance compliance with advanced tools to protect communication and manage the Messaging infrastructure.
Some of the features that have been carried over from Exchange 2007 are:
While some of the features that have been enhanced and new with Exchange 2010 are
Anywhere Access
The goal of the Anywhere Access is to help and manage communication load by offering an easy to navigate, Universal inbox with advanced messaging feature.
Some of the features carried over from Exchange 2007 are
While some of the features that have been enhanced and new with Exchange 2010 are
Flexibility and Reliability
The goal is to provide flexibility needed to operate a scalable high performing and easy to administer messaging infrastructure.
Some of the features carried over by Exchange 2007 are
While some of the features that have been enhanced and new with Exchange 2010 are
Please let me know if the above article was able to provide you with the information you needed.
Terminal Services can provide access to Windows based applications from almost any location to almost any computing device. Terminal Services in Windows Server 2008 includes Terminal Services RemoteApp (TS RemoteApp). Please note that the Terminal Services role cannot be installed on Domain Controller.
RemoteApp programs are programs that are accessed remotely through Terminal Services and appear as if they are running on the end user's local computer. Instead of being presented to the user in the desktop of the remote terminal server, the RemoteApp program is integrated with the client's desktop, running in its own resizable window with its own entry in the taskbar. Users can run RemoteApp programs side-by-side with their local programs. If a user is running more than one RemoteApp program on the same terminal server, the RemoteApp programs will share the same Terminal Services session.
In Windows Server 2008, users can access RemoteApp programs in the following ways:
The .rdp files and Windows Installer packages contain the settings that are needed to run RemoteApp programs. After opening a RemoteApp program on their local computer, the user can interact with the program that is running on the terminal server as if it were running locally. The applications to be published on TS RemoteApp must be installed only after the Terminal services role is installed.
RemoteApp program can be distributed in the following deployment methods:
TS RemoteApp is especially useful in scenarios such as the following:
Please let me know if the above article was able to provide you with the information you needed.
Citrix Licensing: A Citrix License Server is a required component for all XenApp deployments. Install the license server on either a shared or standalone server, depending on your farm’s size. After you install the license server, download the appropriate license files and add these to the license server.
Data Store: The data store is the database where servers store farm static information, such as configuration information about published applications, users, printers, and servers. Each server farm has a single data store.
Data Collector: A data collector is a server that hosts an in-memory database that maintains dynamic information about the servers in the zone, such as server loads, session status, published applications, users connected, and license usage. Data collectors receive incremental data updates and queries from servers within the zone. Data collectors relay information to all other data collectors in the farm. By default, the first server in the farm functions as the data collector. By default, the data collector is configured on the first farm server during the Create Farm Setup and all other servers are configured so they have equal rights to become the data collector if the data collector fails. When the zone’s data collector fails, a data collector election occurs and another server takes over the data collector functionality. Farms determine the data collector based on the election preferences set for a server. The data collector is an infrastructure server and applications are not typically published on it.
Zone: A zone is a grouping of XenApp servers that communicate with a common data collector. In large farms with multiple zones, each zone has a server designated as its data collector. Data collectors in farms with more than one zone, function as communication gateways with the other zone data collectors. The data collector maintains all load and session information for the servers in its zone. All farms have at least one zone, even small ones. The fewest number of zones should be implemented, with one being optimal. Multiple zones are necessary only in large farms that span WANs.
Streaming File or Web Server: Applications can be delivered to users by either streaming or hosting the applications on the server. If you are streaming applications, either to client or server, you must install a streaming file server in your environment. When streaming applications, you create profiles of the application and then store the profile on a file or Web server. The profile consists of the manifest file (.profile), which is an XML file that defines the profile, as well as the target CAB files, a hash key file, the icons repository (Icondata.bin), and a scripts folder for pre-launch and post-exit scripts.
Web Interface: The Web Interface is a required component in any environment where users access their applications using either the XenApp plugin or a Web browser. Install the Web Interface on a stand-alone computer; however, where resources are limited, the Web Interface is sometimes collocated with other functions. For instructions, see the Web Interface Administrator’s Guide.
XenApp Web and XenApp Services Sites: XenApp Web and XenApp Services sites (formerly known as Access Platform and Program Neighborhood Agent Services sites, respectively) provide an interface to
the server farm from the client device. When a user authenticates to a XenApp Web or XenApp Services site, either directly or through the XenApp plugin or the Access Gateway, the site:
Citrix XML Service and the Citrix XML Broker: The Citrix XML Broker functions as an intermediary between the other servers in the farm and the Web Interface. When a user authenticates to the Web Interface, the XML Broker:
The XML Broker is a function of the Citrix XML Service. By default, the XML Service is installed on every server during XenApp Setup. However, only the XML Service on the server specified in the Web Interface functions as the broker. (The XML Service on other farm servers is still running but is not used for servicing end-user connections.) In a small farm, the XML Broker is typically designated on a server dedicated to several infrastructure functions. In a large farm, the XML Broker might be configured on one or more dedicated dedicated servers.
The XML Broker is sometimes referred to as a Citrix XML Server or the Citrix XML Service. For clarity, the term XML Broker is used to refer to when the XML Service functions as the intermediary between the Web Interface and the IMA service, regardless of whether it is hosted on a dedicated server or collocated with other infrastructure functions.
Please let me know if the above article was able to provide you with the information you needed.
With Citrix XenApp 5.0 some of the terminologies are changed as were in Citrix Presentation Server. Below is the list of the terminologies that are changed
- Citrix XenApp is the new name for Citrix Presentation Server
- Citrix XenApp Advanced Configuration is the new name for Presentation Server Console.
- Citrix XenApp Pugin for Hosted Application is the new name for plugin for server side virtualization formerly known as Citrix Presentation Client
- Citrix XenApp Agent is the new name for Citrix Program Agent
- Citrix XenApp Provider is the new name for WMI Provider.
- Citrix XenApp Management Pack is the new name for SCOM Management Packs.
- Citrix XenApp Web is the new name for Citrix Web Interface.
- Citrix XenApp Plugin for Streamed Application is the new name for Citrix Streaming Client.
- Branch Optimization is the new name for WAN Optimization.
- Secure Application Access is the new name for Smart Access.
- Easy Call Voice Services is the new name for Easy Call
- Load Testing Service is the new name for Load Testing
- Provisioning Services is the new name for Provisioning Server for Datacenter.
- Profile Management is the new name for Portable Profile Manager
- Workflow Studio Orchestration is the new name for Workflow Studio