14 June, 2010

Business Continuity Planning / Disaster Recovery Planning

Disaster

A disaster is the tragedy of a natural or human-made hazard that affects negatively and cause irrecoverable losses. Proper Business continuous planning is required to avoid and lessening losses during disaster. The BCP may consist of Hot, Cold or Warm DR Site depending on the Organizational needs. The DR site may be operated at a different location by the Organization or contracted to a vendor who specializes in DR services.


Cold Sites

A cold site is the most inexpensive type of backup site for an organization to operate. It does not include backed up copies of data and information from the original location of the organization, nor does it include hardware already set up. The lack of hardware contributes to the minimal startup costs of the cold site, but requires additional time following the disaster to have the operation running at a capacity close to that prior to the disaster.


Hot Sites

A hot site is a duplicate of the original site of the organization, with full computer systems as well as near-complete backups of user data. Real time synchronization between the two sites may be used to completely mirror the data environment of the original site using wide area network links and specialized software. Following a disruption to the original site, the hot site exists so that the organization can relocate with minimal losses to normal operations. Ideally, a hot site will be up and running within a matter of hours or even less. Personnel may still have to be moved to the hot site so it is possible that the hot site may be operational from a data processing perspective before staff has relocated. The capacity of the hot site may or may not match the capacity of the original site depending on the organization's requirements. This type of backup site is the most expensive to operate. Hot sites are popular with organizations that operate real time processes such as financial institutions, government agencies and ecommerce providers


Warm Sites

A warm site is, quite logically, a compromise between hot and cold. These sites will have hardware and connectivity already established, though on a smaller scale than the original production site or even a hot site. Warm sites will have backups on hand, but they may not be complete and may be between several days and a week old. An example would be backup tapes sent to the warm site by courier.


General steps to follow while creating BCP/DRP

  1. Identify the scope and boundaries of business continuity plan. It provides an idea for limitations and boundaries of plan. It also includes audit and risk analysis reports for institution's assets.
  2. Conduct a business impact analysis (BIA). Business impact analysis is the study and assessment of effects to the organization in the event of the loss or degradation of business/mission functions resulting from a destructive event. Such loss may be financial, or less tangible but nevertheless essential (e.g. human resources, shareholder liaison)
  3. Sell the concept of BCP to upper management and obtain organizational and financial commitment. Convincing senior management to approve BCP/DRP is key task. It is very important for security professionals to get approval for plan from upper management to bring it to effect.
  4. Each department will need to understand its role in plan and support to maintain it. In case of disaster, each department has to be prepared for the action. To recover and to protect the critical functions, each department has to understand the plan and follow it accordingly. It is also important for each department to help in the creation and maintenance of its portion of the plan.
  5. The BCP project team must implement the plan. After approval from upper management plan should be maintained and implemented. Implementation team should follow the guidelines procedures in plan.
  6. NIST tool set can be used for doing BCP. National Institute of Standards and Technologies has published tools which can help in creating BCP.

With the increasing importance of information technology for the continuation of business critical functions, combined with a transition to an around-the-clock economy, the importance of protecting an organization's data and IT infrastructure in the event of a disruptive situation has become an increasing and more visible business priority in recent years.


Control measures in recovery plan

Control measures are steps or mechanisms that can reduce or eliminate computer security threats. Different types of measures can be included in BCP/DRP. Disaster recovery planning is a subset of a larger process known as business continuity planning and should include planning for resumption of applications, data, hardware, communications (such as networking) and other IT infrastructure. A business continuity plan (BCP) includes planning for non-IT related aspects such as key personnel, facilities, crisis communication and reputation protection, and should refer to the disaster recovery plan (DRP) for IT related infrastructure recovery / continuity. This article focuses on disaster recovery planning as related to IT infrastructure. Types of measures:

  1. Preventive measures - These controls are aimed at preventing an event from occurring.
  2. Detective measures - These controls are aimed at detecting or discovering unwanted events.
  3. Corrective measures - These controls are aimed at correcting or restoring the system after disaster or event.

These controls should be always documented and tested regularly.


Further reading

  • "A Guide to Business Continuity Planning" by James C. Barnes
  • "Business Continuity Planning", A Step-by-Step Guide with Planning Forms on CDROM by Kenneth L Fulmer
  • "Disaster Survival Planning: A Practical Guide for Businesses" by Judy Bell
  • ICE Data Management (In Case of Emergency) made simple - by MyriadOptima.com
  • Harney, J.(2004). Business continuity and disaster recovery: Back up or shut down.
  • AIIM E-Doc Magazine, 18(4), 42-48.
  • Dimattia, S. (November 15, 2001).Planning for Continuity. Library Journal,32-34.

28 March, 2010

Project Management

What is a Project?
Project is a temporary assignment which has a definitive start and end date. Project can be considered successful when it meets the objectives of the Stakeholders. Project can be ended on successful closure, or when its objective can't be met, or when the need no longer exists.

What is Project Management?
Project Management is the application of knowledge, tools, skills and techniques to Project activities to meet Project requirements. Project management consists of 5 process groups, these are

  • Initiating – it is the process of determining if a Project is valid and can be delivered successfully
  • Planning – it produces how a plan for Project delivery by defining WBS with Schedule.
  • Executing – it is the actual delivery of project which is conducted using Project processes.
  • Monitoring and Control – It is where Project Manager and Project Management team ensures that the project is delivered on time, on budget, with required resources and the Project is delivered as initiated.
  • Closing – it is gaining final acceptance of the Project and ensuring that the Project is successfully delivered.

What is Project Process?
Project process is defined for the Project delivery team. It consists of

  • Analysis
  • Design
  • Development
  • Implementation

What is Project Lifecycle?
Project management processes and Project processes together form the Project Life Cycle. The relationship of Project management and project processes are illustrated in the chart below

Monitoring
and
Control

Initiating


Executing

Analysis

Design

Development

Implementation

Closing


What is Project Management Office?
Project Management Office (PMO) is an Organization body or entity which is assigned with various responsibilities of centralized and coordinated management of project sunder its domain. The responsibilities can vary from Project management support function to directly managing the projects.


24 March, 2010

Directory Service Requirements for Exchange 2010

Component

Requirement

Schema master

The schema master must be running any of the following:

  • Windows Server 2003 Standard Edition with Service Pack 1 (SP1) or later (32-bit or 64-bit)
  • Windows Server 2003 Enterprise Edition with SP1 or later (32-bit or 64-bit)
  • Windows Server 2008 Standard or Enterprise (32-bit or 64-bit)
  • Windows Server 2008 R2 Standard or Enterprise

Global catalog server

In each Active Directory site where you plan to install Exchange 2010, you must have at least one global catalog server running any of the following:

  • Windows Server 2003 Standard Edition with SP1 or later (32-bit or 64-bit)
  • Windows Server 2003 Enterprise Edition with SP1 or later (32-bit or 64-bit)
  • Windows Server 2008 Standard or Enterprise (32-bit or 64-bit)
  • Windows Server 2008 R2 Standard or Enterprise

Domain controller

In each Active Directory site where you plan to install Exchange 2010, you must have at least one writeable domain controller running any of the following:

  • Windows Server 2003 Standard Edition with SP1 or later (32-bit or 64-bit)
  • Windows Server 2003 Enterprise Edition with SP1 or later (32-bit or 64-bit)
  • Windows Server 2008 Standard or Enterprise (32-bit or 64-bit)
  • Windows Server 2008 R2 Standard or Enterprise

Active Directory forest

Active Directory must be at Windows Server 2003 forest functionality mode or higher.

Extending Database Size limit for Exchange 2010 Standard edition

You can use Registry Editor to modify a database size limit in Microsoft Exchange Server 2010. The default database size limit for Exchange 2010 Standard Edition is 50 gigabytes (GB). There is no default database size limit for the Exchange 2010 Enterprise Edition. The Exchange store checks any database size limits periodically and dismounts a database when the size limit is reached. You can modify the database size limit by adding or changing a value in the registry.

  1. Start Registry Editor (regedit).
  2. Locate the following registry subkey:
    HKEY_LOCAL_MACHINE\SYSTEM\CurrentControlSet\Services\MSExchangeIS\<SERVER NAME>\Private-<database GUID>
  3. If the Database Size Limit in GB DWORD exists for the subkey, change its value to the desired size in gigabytes.
  4. If the Database Size Limit in GB DWORD doesn't exist for the subkey, create a new DWORD with that name, and then set its value to the desired size in gigabytes.


You can get the database guide by the below powershell cmdlet

Get-MailboxDatabase -Identity "<server name>\<database name>" | Format-Table Name, GUID

Supported Exchange 2010 Coexistence Scenarios


The following table lists the scenarios in which coexistence between Exchange 2010 and earlier versions of Exchange are supported.

Coexistence of Exchange 2010 and earlier versions of Exchange Server

Exchange version

Exchange organization coexistence

Exchange 2000 Server

Not supported

Exchange Server 2003

Supported

Exchange 2007

Supported

Mixed Exchange 2007 and Exchange Server 2003 organization

Supported


You can't upgrade an existing Exchange 2000 organization directly to Exchange 2010. You must first upgrade the Exchange 2000 organization to either an Exchange 2003 or Exchange 2007 organization, and then you can upgrade the Exchange 2003 or Exchange 2007 organization to Exchange 2010. It is recommend that you upgrade your organization from Exchange 2000 to Exchange 2003, and then upgrade from Exchange 2003 to Exchange 2010.

26 January, 2010

Try Out: Windows 7 God Mode

Create a folder in Windows 7 and rename it to

GodMode.{ED7BA470-8E54-465E-825C-99712043E01C}

Then check out its contents.

18 January, 2010

Exchange 2007 Mail Submission service stops automatically

Recently I was involved in an issue where Microsoft Exchange Mail submission used to stop silently in day or two on the passive node of the CCR cluster. This used to happen only on one of the Node of the CCR Cluster. There will be no event generated in the logs. This service is responsible for submitting mails from the Mailbox Server to the HUB Server. So in case if the resource fails over to this node then the users will face mail issues. In this case, if the user tries to send a mail, it will stay on their outbox until we manually go and start the service or failback the resources to the other node. While starting the service it used to start without any issue.


I was sure that there is nothing wrong with the server hardware or Operating system or Exchange configuration on this node as there was not a single error getting generated for this issue. I checked the service setting under Service Manager and cross checked with the other node. It was same. I did some goggling but unfortunately couldn't get any answer for this issue. It made me wonder "why am I the only one to face this issue".


After sleeping on this issue for 2 day, I thought of digging in the registry of this node. I went to registry value of HKLM\system\CurrentControlSet\Services\MSExchangeMailSubmission. I starting checking the settings of each registry of this node with the other node. There I found a difference in the values of "FailureActions". On the passive the values were as per the screen Shot in fig 1. While on the passive node it was as per fig 2.


I immediately took the backup of the registry and made the changes on the passive node same as that of the active node. I did some testing by stopping and starting services as well as by doing failover of resources from the active node to the passive node and checking the mailflow. After the testing I failed the resources back to the other node. The services which used to stop earlier in a day or two is now running for over two weeks now.

Note: Please make sure to have a restorable backup of Exchange and registry before performing any changes.

07 October, 2009

Upgrading to Exchange 2007 SP2

Exchange 2007 SP2 Overview

Microsoft Exchange Server 2007 SP2 helps meet the challenges and business needs of any Organization with the stake in messaging system. Exchange 2007 SP2 is a mission-critical communications tool that enables employees to be more productive and access their information anytime from anywhere. For the Administrators, Exchange Server 2007 SP2 provides advanced protection options against email security threats, such as spam and antivirus as well as tools to help manage internal compliance and high availability needs.


Whats New in Exchange 2007 SP2


  • Enhanced Backup Functionality
    Exchange 2007 SP2 includes VSS plug-in for Windows Server backup to support Exchange backups. Once Sp2 is installed, Windows Server backup can be used for backup and restore of Exchange Server 2007 SP2 databases. The new plugin is delivered in the form of a single executable called wsbexchange.exe.

  • Deploying Exchange Server 2010
    Before deploying Exchange 2010 in the coexistence mode of Exchange 2007, all the CAS Server must be upgraded to Exchange 2007 SP2. In addition, all Exchange 2007 Server in Active Directory site, regardless to role must be upgraded to Exchange 2007 SP2.

  • Enhanced Auditing
    New Exchange auditing events and audit log repository enable Exchange Administrators to more easily audit the activities occurring on Exchange Servers. It allows the right balance of granularity, performance and easy access to audited events via a dedicated audit log repository. This simplifies the auditing process and reviewing of audited events in a dedicated location.

  • Dynamic AD Schema Validation
    The dynamic AD Schema update and validation feature allows for future Schema updates to be dynamically deployed as well as proactively preventing conflicts whenever a new property is added to the AD Schema. Once this capability is deployed it will enable easier management of schema updates and will support issues when adding properties that don't exist in the AD Schema

  • Public Folder Quota Management
    Exchange 2007 SP2 provides more efficient way to manage Public Folder Quotas by improving the cmdlets and removing the dependency authoring and visioning Administration to perform management tasks.

  • Centralized Organization Settings
    There are several new cmdlets parameters that have been added that enable centralized management of many of the Exchange Organization settings.


Step by step process for Upgrading Exchange 2007 SP1 to SP2

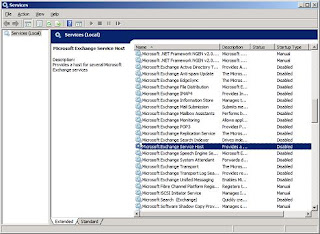
If you are upgrading Exchange 2007 Server in production, then make sure to have a restorable backup of Exchange Configuration and its databases. Although the upgradation is straight forward and come clean bu it is advisable to have the backups in place. During the upgradation process the Exchange services will be stopped and disabled. The downtime may vary from one server to another. You may plan for a downtime of 30 - 45 mins. See screenshots below


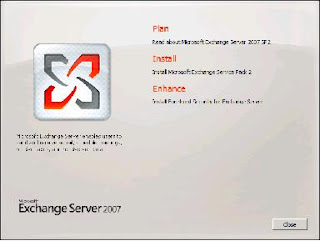
Once you are readyfor upgradation, download Exchange 2007 SP2 from the link. Extract SP2 and run setup.exe. You will get the screenshot as below


Click on install Exchange 2007 Service Pack 2


On the introduction screen click on next.


On the license page click on I accept and click on next.


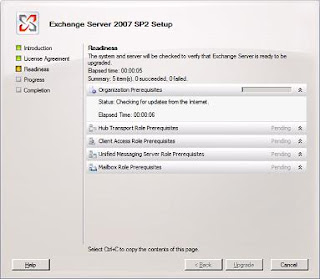
Readiness check will be performed. Once completed Click on Upgrade to start the upgradation.


It will then start upgrading Exchange Server to SP2. During this process Exchange services will stopped.


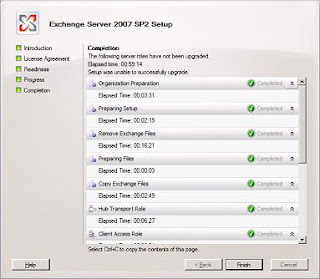
On successful completion page click on Finish. Your Exchnage Server is now upgraded to Service Pack 2.


Please let me know if the above article was able to provide you with the information you needed.

Deploying Exchange 2007 SP1

Exchange 2007 Server Roles
  • Mailbox Role: The Mailbox role provides email storage and advanced scheduling services for Microsoft Office Outlook users. The Mailbox Server role also includes public folders
  • Client Access Role: The Client Access Role (CAS) enables clients to connect to their Exchange mailbox through Outlook Web Access, POP, IMAP or through mobile device using activesync. this role also provides free buy lookup and offline address books.

  • HUB Transport Role: The HUB Transport role (HUB) provides routing within a AD Site. HUB Server can be used for applying messaging policies, security polices, antispam and antivirus policies to email messages in Transport.
  • Unified Messaging role: The Unified Messaging role (UM) role provides connectivity between a corporate telephony system and Exchange Server. Clients can access their mailboxes from any telephony or mobile device using Outlook Mobile Access (OMA) and perform almost the same functionality as OWA.
  • Edge Transport Role: The Edge Transport role performs antispam amd antivirus filterin and applies messaging and security policies to the inbound and outbound external messages in the transport. This role is deployed in the perimeter network.

Prerequisites for Deploying Exchange 2007

  • Domain Name System (DNS)

  • Windows 2003 based Active Directory.

  • The Forest and Domain functional level should be Windows 2003

  • The server on which Exchange needs to be deployed should be member of Active Directory Domain.

  • AD DS and IIS roles is required to be installed from Server Manager

  • .Net and Windows Powershell features is required to be installed.

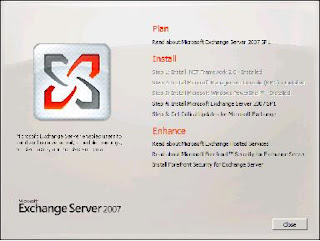
By taking care of the above we are now ready for implementing Exchange 2007 SP1. Given below are the step by step process for implementing Exchange 2007 SP1. Pop in Exchange 2007 installable DVD and double click on Setup
You will be presented with the above screen. Step 1, 2 and 3 will be highlighted if the required prerequisites are missing. For installing Exchange 2007 SP1 click on Step4. You will be presented with the below screen.
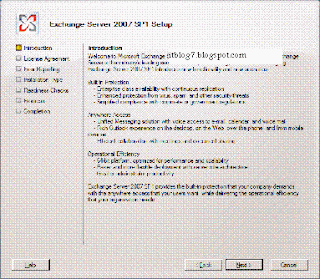
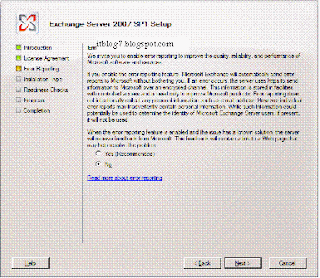
This screen provides brief introduction about Exchange 2007 SP1. Click on next


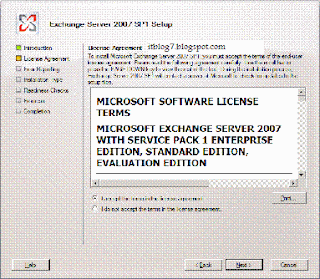
The next screen is for license agreement. Accept on the license agreement and click on next.


The above screen is for how you want to report errors to Microsoft. For this deployment sake I have selected No. Click on next to get the below screen.


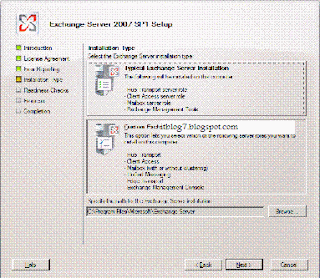
The above window gives you the option to choose the role that needs to be deployed on the Exchange Server. Click on Custom to select the roles that needs to be deployed.


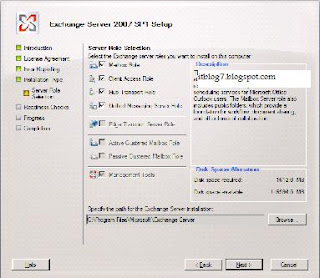
I have selected all the roles that can be deployed on a single server. Edge server can only be deployed in the DMZ. Click next.


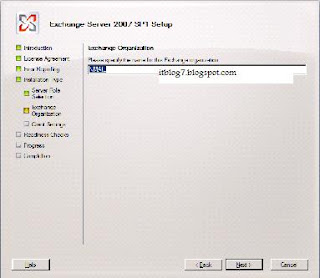
Type the name of the Exchange Organization. For this deployment I have put as NMAIL. Click on next.

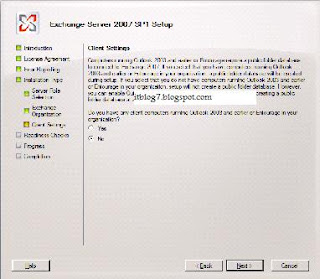
On the above select Yes if any of your users are using clients older than Outlook 2003. For this deployment I have selected No. Click on Next.


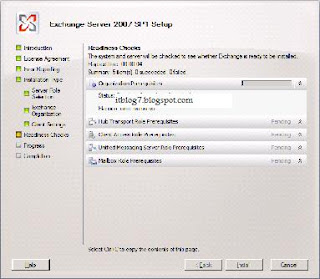
On this screen the setup does a readiness check before starting the installation. Once done click on Install


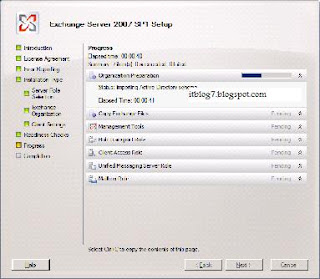
The installation process starts for the roles selected. Click on Next.

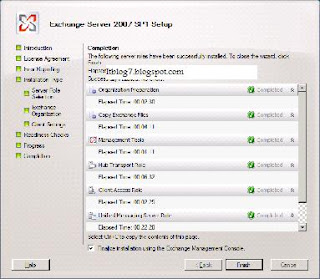
The screen above gives you the status of the deployment. You get completed for all the roles selected for deployment that indicates you are done with the deployment.
Please let me know if the above article was able to provide you with the information you needed.

05 October, 2009

Configuring permissions with SCCM

Object

Rights to create

Rights to modify

Rights to delete

Rights to distribute

Boot Images

Create\Boot image package, Read\Boot image package

Modify\Boot image package, Read\Boot image package

Delete\Boot image package, Read\Boot image package

Read\Boot image package, Modify\Boot image package, Distribute\Boot image package, Read\Site

Computer Association

Create\Computer association, Read\Computer association, Read\Collection

Modify\Computer association, Read\Computer association

Delete\Computer association, Read\Computer association

Not applicable

Operating System Images

Create\OS image, Read\OS image

Modify\OS image, Read\OS image

Delete\OS image, Read\OS image

Modify\OS image, Read\OS image, Distribute\OS image, Read\Site

Operating System Install Pacakges

Create\OS install package, Read\OS install package

Modify\OS install package, Read\OS install package

Delete\OS install package, Read\OS install package

Modify\OS install package, Read\OS install package, Distribute\OS install package, Read\Site

Task Sequences

Create\Task sequence package, Read\Task sequence package, Modify\Task sequence package

Modify\Task sequence package, Read\Task sequence package

Delete\Task sequence package, Read\Task sequence package

Modify\Task sequence package, Read\Task sequence package, Distribute\Task sequence package, Read\Site

Advertisement (for task sequence)

Read\Task sequence package, Read\Collection, Advertise\Collection, Read\Package, Create\Advertisement

Modify\Advertisement, Read\Advertisement

Delete\Advertisement, Read\Advertisement

Not applicable

Task sequence bootable media

Read\Task sequence package, Create Task sequence media\Task sequence package, Read\Site, Manage OSD and ISV Proxy Certificates\Site, Read\Boot image

Modify\Task sequence package, Read\Task sequence package

Delete\Task sequence package, Read\Task sequence package

Not applicable

Drivers

Create\Device driver, Read\Device driver

Modify\Device driver, Read\Device driver

Delete\Device driver, Read\Device driver

Not applicable

Driver package

Create\Driver package, Read\Device driver

Modify\Driver package, Read\Driver package, Distribute\Driver packages

Delete\Driver package, Read\Driver package

Not applicable

Please let me know if the above article was able to provide you with the information you needed.